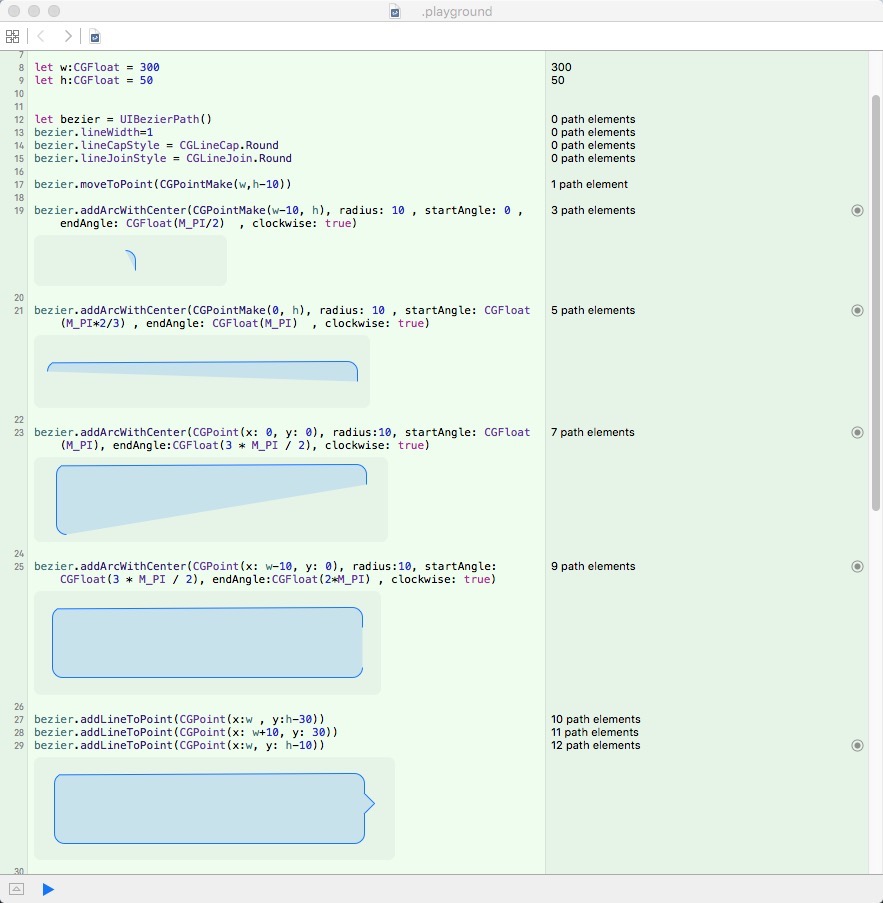
使用UIBezierPath画聊天气泡 发表于 2016-10-11 | 分类于 IOS , Swift 使用UIBezierPath画聊天气泡 画图1234567891011121314151617181920212223let w:CGFloat = 300let h:CGFloat = 50let bezier = UIBezierPath()bezier.lineWidth=1bezier.lineCapStyle = CGLineCap.Roundbezier.lineJoinStyle = CGLineJoin.Roundbezier.moveToPoint(CGPointMake(w,h-10))bezier.addArcWithCenter(CGPointMake(w-10, h), radius: 10 , startAngle: 0 , endAngle: CGFloat(M_PI/2) , clockwise: true)bezier.addArcWithCenter(CGPointMake(0, h), radius: 10 , startAngle: CGFloat(M_PI/2) , endAngle: CGFloat(M_PI) , clockwise: true)bezier.addArcWithCenter(CGPoint(x: 0, y: 0), radius:10, startAngle: CGFloat(M_PI), endAngle:CGFloat(3 * M_PI / 2), clockwise: true)bezier.addArcWithCenter(CGPoint(x: w-10, y: 0), radius:10, startAngle: CGFloat(3 * M_PI / 2), endAngle:CGFloat(2*M_PI) , clockwise: true)bezier.addLineToPoint(CGPoint(x:w , y:h-30))bezier.addLineToPoint(CGPoint(x: w+10, y: 30))bezier.addLineToPoint(CGPoint(x:w, y: h-10))bezier.closePath() 使用123456789//加到CAShapeLayer,效果出来了let shapelayer:CAShapeLayer = CAShapeLayer()//设置边框颜色shapelayer.strokeColor = UIColor.redColor().CGColor//设置填充颜色shapelayer.fillColor = UIColor.purpleColor().CGColor//就是这句话在关联彼此(UIBezierPath和CAShapeLayer):shapelayer.path = bezier.CGPath;self.myview.layer.addSublayer(shapelayer) 本文标题:使用UIBezierPath画聊天气泡 文章作者:史彦超 发布时间:2016年10月11日 - 22:10 最后更新:2021年07月20日 - 16:07 原始链接:https://doingself.github.io/2016/10/11/2016-10-11-%E4%BD%BF%E7%94%A8UIBezierPath%E7%94%BB%E8%81%8A%E5%A4%A9%E6%B0%94%E6%B3%A1/ 许可协议: 署名-非商业性使用-禁止演绎 4.0 国际 转载请保留原文链接及作者。 Donate comment here 打赏 微信支付 支付宝 比特币